Garnish: Mise-en-Place| Foody Categories| ITCC:If thoughts could cook!

Saturday, December 31, 2005

The magic of Basmati!

OR "Making Basmati - 101" :)

Many may have heard of the phrase, "Basmati - the queen of rice!" And all those who have had a perfect bowl of Basmati know what I'm talking about.

Basmati literally means, "Queen of fragrance" in hindi. And thats what is. Lovely long grained rice, with a beautiful fragrance and delectable flavour..... if cooked to perfection, it can be an awesome companion to any gravy, curry, soup and superb just by itself!

Today I share with you some well known and some *may be* not so well known tips and tricks to get your basmati the best!

Before Cooking

Basmati rice has a lot of starch stuck to the grains and so it needs to be cleaned thoroughly before cooking or you'll end up with sticky grains.
Try washing it 2-3 times with your hands rubbing the grains to get the starch off, till the water stops becoming milky/pearly and instead stays clear. And when you think you're done - wash it one more time!

Cooking Basmati

We all make rice in lots of ways. Four most common ways are -
  • In a pressure cooker.
  • In a rice cooker.
  • In a microwave.
  • In a deep covered pot.
Preparation tips =>
  • Add a teaspoon of ghee / butter / olive oil / vegetable oil while cooking to ensure that the grains don't stick.
  • If making rice for savouries (not sweets),
    • add 2 teaspoons of lemon juice to the water and rice, that way the grains cook longer!
    • try adding a teaspoon of cumin seeds (raw) if making rice to accompany curries. Boiled/steamed cumin tastes yumm.
    • try adding inch long strips of ginger (raw) when making rice for Rajma/Chhole, if you're a ginger lover - the crunchy ginger will taste divine when cooked.
  • Always consider whether you're cooking just rice or adding vegetables as well, becuase that will increase the quantity of water and spices/garnish.

Some tips for each method of rice preparation =>
  • Pressure Cooker -
    • When measuring water for the rice, dip your finger till your finger tip just touches the rice and if the water just reaches over the first line on the finger (eg out of the three lines that we have on each finger! :P) - then thats enough.
    • Usually 2 whistles should be enough if rice has been pre-soaked the rice for an hour. Or 3-4 if not.
  • Rice Cooker/Microwave -
    • Usually equal quantities of rice and water are used. Please read the instructions from the manufacturer - incase the power of the instrument requires a different measurement.
    • Make sure to stir the rice half way through the cooking to ensure that the grains cook evenly.
  • Deep covered pot(The oldest way, and also one with many variations)-
    • Start with equal quantities of rice and water and you can add warm water as the cooking goes on if you think the rice have become too dry.
    • Stir occasionally to ensure rice dosen't stick to the sides. If it does and rice is still uncooked then that will indicate that more water is required.
For Savoury Rice Dishes -

Two choices -
  • Stir-fry/Add rice to the fried spices + vegetables after cooking rice separately.
  • Fry the spices + vegetables and then add them to the rice and water thats ready waiting to be cooked.
And both methods are just as good, the only deciding factor may be time (cooking together can be faster), and choice of taste (rice cooked seperately is less likely to turn sticky/over cook).

So the choice is upto you! =)

Try fried rice or yogurt rice. And hopefully I'll have more rice delicacies for you in the future!

Monday, December 19, 2005

Making Curries - 101

The idea of this post is to share various techniques to get an Indian curry with the perfect consistency - Not too thin and *hopefully* not too Thick!

So lets get going right away.
I have seperated the ideas into two categories, the first ones are things we can do at the start of preparation while the rest can be done if the curry is almost ready and you realise that its too runny or watery and not how you'd like it to be.

At the Start of Preparation --

--> If you use canned tomatoes - Look for "crushed" tomatoes, as they make better gravy. *I always keep a can or two for emergency even though I buy tomatoes fresh!*
--> If making a curry with onions and tomato where these ingredients dont need to be seen in chunks - Chop both onions and tomatoes really really fine.
--> If making a curry where you'd like to see strings of onions floating around but also want a relatively thick gravy - Chop half of the onions in slices while the rest into really fine pieces.
--> If making Paneer curries (like Palak Paneer or Mattar Paneer or Butter Masala etc) - Use a food processor or grinder to turn the onions into a thick paste, this will provide a beautiful texture for the gravy!

For all the above ideas - when you start cooking them - follow the steps below:
1. Heat oil. Add the initial spices (usually asafoetida and cumin/mustard seeds). Let the seeds sputter a bit.
2. Add the onions (chopped or paste). Add the ginger/garlic paste (if needed). Cook till onions are slightly golden brown.
3. Add the flavor spices (usually Garam Masala, Chilli powder, Turmeric Powder, Rajmah Masala, Chhole Masala etc etc and Bay leaves or Curry Leaves etc - as needed). Cook the onions in these spices for a few minutes and let the flavour and aroma of the spices intensify.
4. Add the tomatoes (chopped or paste). Add half a cup of water and let this mixture cook till it starts bulbing and boiling and forms a reasonably thick paste.
5. Now you can add whatever vegetables/lentils/beans etc that you are cooking.

At the End of Preparation --

To fix thin/runny/watery gravy:
--> If your curry has lentils, beans or potatoes etc in it, you can -
* Use a wooden/steel potato masher - and press some of the ingredients against the bottom or the side of the vessel and mash them into a thick paste. Then stir and check if your gravy is thick enough. If not repeat till you get it the way you like.
OR
* Take almost a cup full of gravy with these beans and process in a food processor. Then pour them back into the vessel to get the thick consistency.

--> If you are a cheese lover - Add a few slices of cheese to your gravy and cook till it melts completely and thickens the gravy.

--> If you are a bread lover - Crush a few slices of bread with hands and add to the gravy and stir well and let it cook till the bread pieces are gone.

--> If your gravy is watery and you just want it thick but not change the taste at all - Add 2 table spoons of flour to the gravy and cook for about 5 minutes till the bubbles dissolve completely.

To fix a thick/chunky gravy:
--> If you are a cream lover - Add half a cup of cream into the gravy and let it simmer till it reaches the desired thickness.

--> If you just want to make it slightly thin - Add warm water to the gravy and let it boil till it reaches the desired thickness.


So as you can see.... its all in the preparation!
If you know exactly what you want - there are always more than one ways to get there......

:)

See you next time! ;)

Thursday, December 15, 2005

Indian Cooking Basics

Here's a mini series for all you food lovers - the idea being to share the obvious and the not so obvious cooking tips when preparing Indian meals.

Disclaimer - Being a north Indian, my tips may and will seem full of north Indian cooking ideas. Though I do feel that the steps/tips of this series are not exclusive to just north Indian cooking - they can But worry not as I'll share my south Indian tips that I have picked up here and there and sprinkle them every once in a while as well.


OK...so you're ready?

Lets Dig in!!!
:)

Monday, December 05, 2005

Cherry Apricot Parfait

Friends coming over after dinner? Looking for a quick and easy dessert thats absolutely delish and oh! so easy to make?!

I have the perfect solution for you.... This recipe from a mate here is Oz looks yummy and tastes really great too!!

Cherry Apricot Parfait


Ingredients --
A bottle of prepared Custard
A tub of Cherry yogurt
A can of Apricot halves
Almond biscuits OR fresh cherries for topping

Method --
1. Halve the apricot pieces and set them aside.
2. Fill 1/3 of a glass with custard, then layer apricot pieces over it.
3. Fill the next 1/3 with cherry yogurt and then another layer or apricots.
4. Top up with custard and an optional final layer of apricots.
5. Dress it up with crushed biscuits or fresh cherries!

Chill it for like 15mins and Enjoy.

Easy...No?!!
:)

Thursday, December 01, 2005

Lentil Burgers

Who said that we vegetarians dont have much choice when it comes to burgers?! Hungry Jacks here is Oz have the best Vegie burgers, Subway have a great Veggie Subs and even Mackers had a cool Chickpea patty - veg burger in their Salads plus menu just a few months ago!

Here's my version of the vegetarian burger - that's made of black lentils which will have you licking you fingers! :)

Lentil Burgers


Ingredients --

2 cups Brown Lentils - cooked
1 large onion - finely chopped
2 small carrots - grated
1 garlic clove - minced
1/2 cup freshly made bread crumbs (just process fresh bread in a mixie/food processor)
1 large potato - boiled and mashed (optional)

1 teaspoon Cumin powder
1 teaspoon Coriander powder
2 tablespoons Soy Sauce (optional)
Ground Black Pepper to taste
Chilli flakes (optional or how hot u'd like)
Salt to taste

Method --

1. Heat oil in a pan. Add the onion and garlic. Cook for a few minutes till the onions turn golden brown. Add spices, cumin and coriander powder and cook for a minute. Remove from heat and let it cool.
2. In a large bowl, put the onion mix, grated carrots, lentils, potato and bread crumbs. Mix well.
3. Add the soy sauce, black pepper, chilli flakes and salt. Mince the lentils so that they will bind with the rest of the mixture.
4. Form flat patties and put aside.

Cooking options -
--> 1. Heat very little bitof oil in a flat pan and then cook the patty on each side - till its crispy.
--> 2. Preheat oven. And place patties on a baking sheet and cook for about 30mins. depending on the heating capacity of the oven. Make sure to flip midway to cook the other side.

ENJOY!

To make burgers -

Ingredients --
1 small ripe avocado - mashed into paste.
few slices of tomato
few slices of beetroot
shredded lettuce or salad leaves
Burger buns

Method --
1. Apply avocado paste to bun base.
2. Top with salad leaves, then beetroot and tomato slices. Add the patty and complete with the bun lid.

Variations --
* You can add cheese slices.
* You can apply mayo to the bun lid.
* Basically... do all sorts of stuff that you'd do to make it "YOUR" fav burger! :D

Monday, November 21, 2005

The king of Dals - Dal Makhaani

Lentils (or what we call Dal) have a strange association with Indian food. For thousands of years.... they have been tried and experimented and the taste has evolved from simple boiled soups to beautifully textured curries...... And still - depending on the mood and the vegetables that you're cooking - Dal till this date can blend beautifully and can be either the highlight of the spread or the silent accomplice.

So the long promised Maharajah of Lentil curries is here today.
Dal Makhaani, literally means 'Lentils in Cream'. And people have all sorts of ways of making their Dal creamy..... some add bucket loads while the curry is cooking while some others prefer to garnish the Dal with a large dollop right at the end. I do whatever I feel like depending on the mood! :)

Dal Makhaani


Ingredients --

1 cup - Black Lentils
1/2 cup - Kidney beans
1/2 cup - Bengal Gram *Chana dal*
1/4 cup - Yellow Lentils or Toor Dal *Arhar dal*

1 inch finger of ginger chopped coarsely
1 tablespoon garlic finely chopped
1 large tomato (or two small ones) finely chopped
1 large onion finely chopped
2 green/red chillies finely chopped

1 tablespoon Coriander powder *dhania powder*
1 tablespoon Garam Masala
1/2 tablespoon Rajmah Masala
1 tiny pinch of asafoetida *heeng*
2 teaspoons of turmeric powder *haldi*
1 teaspoon of cumin seeds *jeera*
4 table spoon of oil/ghee
Chilli flakes (optional or how hot u'd like)
Salt to taste

And ofcourse Cream!

Method --

1. Mix the Black lentils, Kidney beans, Bengal gram lentils and Yellow lentil and wash thoroughly. Then soak these lentils in water (enough to cover the lentils and an inch above the level of the lentils) - for atleast 4-5 hours. You can simply leave them overnight if you want them all ready for your Saturday lunch!
2. Wash the lentil mix after soaking is complete and pressure cook them with ginger, turmeric powder and salt. Let it cook for upto 4 whistles.

*Basically the more you soak - the less whistles you need and vice versa! I have cheated at times and soaked the lentils for barely two hours and then given them upto 8 whistles!! And all just to make sure that the lentils and the kidney beans are cooked really well.*

3. In a large pan, heat the oil. Add the asafoetida and cumin seeds and cook slightly till they sputter. Add the chopped chillies and cook for a minute.
4. Add the onions and garlic. Cook for a few minutes till the onions turn golden brown. Add spices - i.e. turmeric powder, chilli flakes, Coriander powder, Garam masala and Rajmah Masala. Mix well and let the spices blend with each other and layer the onions.
5. Add the tomatoes and cook the mixure for upto 3 minutes or till the whole mix turns into a saucy paste. Can add half a cup of water while cooking if the mix is too dry.
6. Add the boiled Lentils, mix the whole mixture really well and cook in low flame for about 10 minutes.

All done!

Garnish with chopped coriander and serve with a dollop of cream in top. For cream lovers you can add the cream to the cooking Dal in the last minute and let it blend into a milky looking Dal.

This can be enjoyed with warm rotis or Naan or steamed Basmati rice!
:D

Monday, October 31, 2005

Carrot+Coconut Barfi

Its Diwali today and I bring to you an "extremely" easy sweet-dish that my didi 'elder sis' told me to make 2 years ago... on my first Diwali here in Oz without her (when she got married :( )

I was sad n homesick .... n didnt feel like doing anything at all. And she called and asked what I was making for Diwali and I mumbled, "Nothing!" as I thought of the juicy gulaab jamun's that she used to make every year for the last three years she was in Oz with me. And she scolded me disprovingly and said, "No! Get up and make something. You can't NOT do anything on Diwali. I'll tell you something very easy that you'll make in 10 mins."

So, dear blogmates, here is what she told me to do -

Gaajar aur Naariyal Barfi ( Carrot+Coconut Barfi)


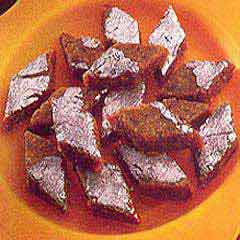
*I have scoured the web, but cant find the pic. So here's me cheating n posting something similar, but shall post my own pics one day when I get my own digi camera!* :)


Ingredients --
5 medium length carrots - peeled and grated
1 small cup grated or dessicated coconut. *you can use dry ones from the super market as I do, but I'm told that fresh ones taste good too!*
1 teaspoon cardamom powder *or 4 crushed cardamoms*
2 tablespoons of pure Ghee
few strings of saffron
sugar to taste

Method --
1. In a pan, heat the ghee for a minute, then add the grated carrots and cook for about 4 minutes.
2. Toss frequently so the carrots dont burn. Add the coconut, cardamom and sugar and mix well. Cook for another 2 minutes or till the mixture becomes thick and the ingredients start sticking to each other.
3. Sprinkle the saffron strings and mix and then put aside.
4. Take a flat plate and spread some ghee all over it with fingers. Then spread the carrot mix on the plate. Can have as thick as you like (but remember that its its too thick it'll fall into pieces when you pick them!)
5. Cover and leave in a cool place to set for a few hours or overnight if possible.

Garnish with silver or dryfruits if you like them and cut into bite size pieces.
And the yummy barfi is ready!! :D

My best wishes for you and your families on this festive season!
God Bless!!